Wednesday, December 9, 2015

Project 3- Photo Restoration Reflection Journal

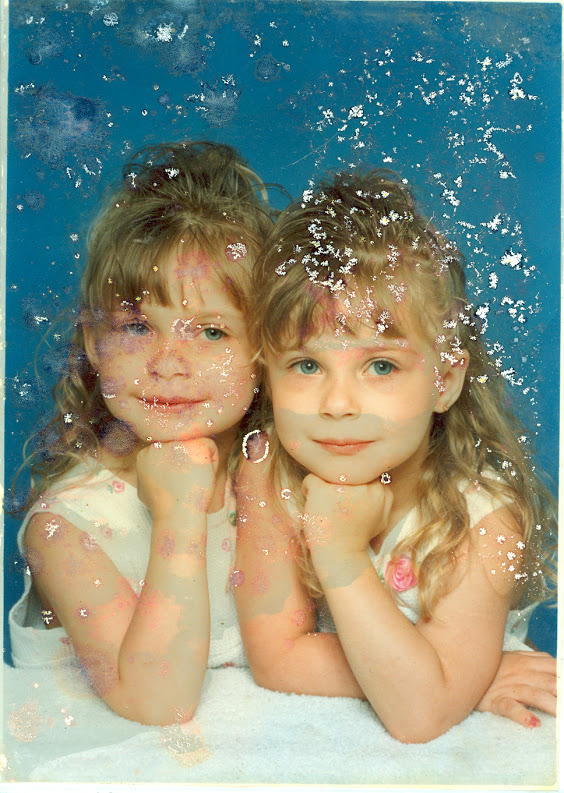
               In project 3, we had to incorporate some of the skills and tools we learned in lab 6. For this given project we used the application Adobe Photoshop CS6. This project was a bit different from the previous projects we have done because we were given a photo which had many stains on the background and on the two girls faces, arms, and hair. The photo we were given, focused on two little girls and we had to retouch all the stains, located all over the photo. I only used the patch tool, clone stamp tool, and the healing brush tool to complete this project. I used the patch tool when it required me to get rid of the stains from the girls hair. However, the first step I took in completing this project was getting rid of the stains from the background. I did this by using the clone stamp tool, cloning the blue colored background onto the stains. Next, I used the clone stamp tool again to get rid of the stains in the white blanket, located at the bottom. Since part of the fingers from one girl was missing, I used the clone stamp tool again to fill in the missing part of the finger. Afterwards, I moved on to use the healing brush tool. I used the healing brush tool to get rid of the stains in the girls arms and part of the stains located in the face. I barely used it on the face because at times it made the face look bruised. Therefore, for the face I used a mix of both the patch tool and history brush. The girl on the left side had her whole lips stained. Due to this, I had to use the patch tool by using destination and not source, I patched the lips of the girl to the right and then moved the copy onto the lips of the other girl. After this, the lips still did not look as great so I tried fixing it a little bit by using the clone stamp to try to fill in parts of the lips. Furthermore, I used the patch ( using destination) too as well to patch one of the eyes from the girl to the right and locate it to the left eye of the girl loved to the left because her left eye was great stained.
               I was not able to finish this project. However, even though I couldn't finish this project, I did boy doing this project very much. It was a bit difficult to get rid of some stains but I found it fun. I was a bit disappointed that I wasn't able to finish retouching the photo because I believed I was doing a good job. In this project I learned something new, I learned the that you can use the patch tool in two ways, either using source or destination. Source is when you patch something and it disappears and when you use destination, when you patch something it's sort of like duplicating the subject you patched and moving it to the destined place you want. When doing this project I found that the most easiest part was getting rid of the stains in the background because it had a big space in which you cannot mess up. I was scared to do the hair because I thought it was going to be very hard because I did not really know how to use the patch tool. However, this project has helped me further improve my skills and understanding in using the patch tool. I believe this project made us think more because we had to use the right tools in order to make the photos look original. By original I mean not retouching the photo in a way that it seems like we edited, by using the right tools, we do not have to over edit the photo. We have to make the photo look realistic. Most of my classmates wanted to finish the project on time, so they just patch the face of the girl to the right and used destination to put it on the girl to the left. I did not do this. A reason for not doing this was because each girl may look similar, like twins, but they have features that distinguish them from each other. Therefore, I tried using other tools to get rid of the stains, even though patching the face could have made the job quicker. In this project you need to have the patience, work hard, and take your time. Additionally, to improving my understanding on the patch tool, I also managed to get work on my patience. I'm glad with the progress I made. With this project I have learned to be more patient and use my time wisely. This will help me in the future because this project has taught me some of the skills magazine editors have to do on a daily bases, which is not as easy and quick to accomplish. Project 3, has shown me a career I may be interested in the future.

            Original                                                           Retouch                                                                                                


Sunday, November 29, 2015

Lab #6 - Editing Tools Reflection Journal

          We were given four photos to edit. For our first lab this third marking period (our 6th lab overall), we were required to use the application Adobe Photoshop CS6. In this lab we learned how to use new photoshop tools such as, the clone tool, spot healing brush tool, healing brush, patch tool, smudge tool, dodge tool, sharpen tool, blur tool, burn tool, and the sponge tool. The photos we were given, we had to fix some minor errors located in the images and make them better. However, in competing this process, we had to make sure we did not edit the photos too much that they seem edited. In pic a, I used the clone tool to fix the rip in the bottom left of the picture, in order to use the clone stamp you have to press down the option key, so the tool can get a hold of what you want to clone. Next, I used the spot healing brush to get rid of the sprinkler heads. The following picture, picture b, I used the healing brush to erase the initials DJ from the rock and to erase the chips and holes. Then, I used the patch tool to get rid of the big crack located on the right side. For picture c, I used the healing brush to get rid of the wrinkles located in the mans forehead. In addition, I used the patch tool to get rid of the following wrinkles under the eyes. Lastly, in picture d, we first started off using the marquee tool to select the top part and change its color, I changed the color to a maroon color by using replace color. Afterwards, I applied the smudge tool for the tiles in the bottom. I used the sharpen tool to sharpen the right windows and the blur tool to blue the left side of the window. The dodge tool was needed to be applied on the the side of the window door and on the right side I used the ben tool. And for the finishing touch, I used the sponge tool to desaturate the left side of the roses and to saturate the right side of the roses.
          I found this lab a bit easy because some pictures were easier to edit compared to others. The thing that made this project a bit difficult was because we were brought upon new tools we have not used in our previous labs or projects. Most of the tools were easy to learn, but one tool I found myself having difficulty using was the patch tool. I feel like I still need more practice using the patch tool out of all the tools we have learned to use. This is why when recreating picture c, I had trouble because in order to get rid of the wrinkles under the eyes we had to use the patch tool. I was a bit scared because I did not want to over exaggerate a picture, making it seem like I edited it too much. I found this picture the most difficult to work with. However, I really enjoyed editing the last picture, picture d, because it required us to experience/use the most tools. And I really loved how picture d came out as a result, as well as my other three pictures. Overall, I found this project very fun to work on especially when we used the text tool because we also learned how to use the rectangle tool. We used the rectangle tool, and filled the background with a gradient color and then we used the text tool to place our text inside the rectangle. This time we were able to warp our text into a different style. In the future, these new tools will help us emphasize on a picture especially because I the tools we learned in the project can help cover up mistakes and make some mistakes not seem like mistakes.


Tuesday, November 17, 2015

STEM Symposium Reflection

     Our trip to Queens College, the STEM Leadership Symposium event, was a great experience that taught me great things. At the beginning of the presentation, we learned and discussed about leadership. My definition of a great leader, is someone who knows their strengths and weaknesses, using their strengths to teach others and knowing how to improve their weaknesses. In leadership communication is very important because everyone must state their thoughts in order to accomplish a mission in a satisfying way. My favorite part of this trip was when the four individuals spoke to us about STEM/ coding. This was my favorite part of the symposium because they told us not to worry or be scared of what's to come. Everyone has to go through obstacles in order to accomplish and learn new things. There always comes a point in our lives in which we have to try very hard and work nonstop to learn something new, and all that effort comes to us becoming an expert at something. Additionally, we have to be confident and not be scared of taking risks. Taking risks means to try hard no matter what the outcome turns out to be because at the end you know you did something right and you followed your instinct. In additions, to this I liked how they told us no matter what carter we want to pursue STEM still comes in handy because as the 21st, technology plays a huge role in society. In any career, there's always a way you can connect technology to it. However, the part I didn't like in the symposium was that in the panel ( where the 4 individuals spoke) they mostly talked about coding. I wished they could have talked a bit more about other things instead of just sticking to one topic which was coding. Overall, I hope to attend other symposiums such as this one to learn much more things to broaden my knowledge.


Monday, November 16, 2015

Class Performance Reflection

               As of November 16, 2015, my final second marking period grade is a 96.2. In this class, I perform greatly in the homework/blog category. I do best in this category because I always compete my homework and complete it when its due. I can never go a day without making sure if I have homework to complete. For example, when I write my blogs, I write down all the emotions and ideas that come up in my mind. I try to write as most thorough as possible in order to make my writing and thoughts flow smoothly. However, I perform worst in the project category. But on the other hand, I am not missing any assignments. I can further improve in this particular subject by gaining more confidence in my work and work much harder than I do. I must give it my all, to not stress over anything and not give up. Instead, I should tell myself that I can finish my projects and labs on time, in a way in which I will be proud of my work. One major problem is that I must manage my time in a more precious way. As the year progresses, I know I will get better in doing labs and projects because I will have more practice using some photoshop tools, and as I get more comfortable with my classmates, I could improve my class participation as well.


Friday, November 13, 2015

Lab #4- Image Adjustments (Part 2)

         This fourth lab was mostly considered as a test grade for us. We only had 20 minutes to complete it but afterwards we got more time to complete this lab due to the number of individuals who weren't able to finish. In this lab we had to pick the choice of either choosing one of our pictures or choosing the car picture given to us. First, I opened a new file, named it Lab4_my name_vd and made sure the canvas size was 800 by 600. I placed the image of the car and then made two canvas, I dragged the car image into the second canvas and once I did this, I duplicated the image 3 times, in total I had four images of the same car. Before we had to go to image and change its size to 250 by 186. Once I did this, I moved the duplicated images and overlapped one after another. The whole point of this lab was to adjustment the images. Therefore, for the fourth layer I went to image and  adjustments and then for this layer we had to use the Black and White technique. At then end I called the later Black and White. Next, for the third layer I renamed the layer Saturation because in this image, we only had to increase the color saturation, nothing else. Afterwards, in the second layer, we had to remake the red color of the car. I did this by going to Replace Color ( located under the image menu) and then at first I wasn't sure if how to replace the color of the color, but then I saw if you increase the fuzziness of the picture, it was easier to see the car. I picked a color (green) and clocked in the car, at the end the red car turned green, and I renamed the layer Replace Color. Finally, for the first later, I only changed the hue of the image, either by increasing or decreasing the hue.
          In order to fully complete this lab, I used the text tool to type which image adjustment I used for each image. I placed the text next to each image. Since, we had another day to complete this lab, I tried to make it better by just adding the original image, in order to show the difference between the original picture and the adjustments I used got each image. I saved this file as a PNG and uploaded it to JupiterGrades. I'm very proud of my result, at first I was having difficulties because due to the amount of time we were told we had to complete this project, I felt a bit a scared of not being able to finish the prohext. This made me not think clearly about what I first had to do, but then I told myself to calm down and have faith that I'll finding the project, this made me think much more better. Some of the skills needed to complete this lab reminded me of the skills we had to use in the Warhol project.  Overall, I think this lab was great because it tested how much we remember, such as the skills we learned in previous labs and projects. 


Lab#5 Filters Reflection Journal

             For Lab #5, we used the application Abode Photoshop CS6, in this lab we had to experiment with the filters. We had to select two different types of pictures, one to use for the liquify filter, which was mandatory to use, and another picture that we must duplicate another 4 times in order to apply a different type of filter. In order to apply the liquify filter, we had to use a photo of a person (for example a photo of ourselves) and for the other photos, we could have chosen any picture we wanted.  For the first picture, I used the liquify effect, then for the second picture I used the glowing edges effect. As for the third picture, I used Ocean Ripple which can be found in the distort section of the filter gallery and in the fourth picture I used Lens Blur, which is found under filter and blurs. Afterwards, for the fifth photo I used Photocopy which is found under Sketches and for the final picture I used the Paint Dabs effect which is located under the Artistic section of the filter gallery. For the finals touches, I added texts, labeling which effect I used for each picture and we were even required to add a filter to the background. We did this by going to filter and then going to render and clicking on clouds.
                 This lab has taught me a new skill and has also taught me that there's more to photoshop than what we think. With photoshop, there are many options to use to enhance or make a photo look more interesting. In this lab, I enjoyed doing this and experimenting with the filters because there were so many filters I wanted to use. However, I chose the filters I believed looked great with the picture. What I mean is, for example, I chose the ocean ripple over other effects under the distort section because unlike the other effects, Ocean Ripple made the photo seem more interesting and makes the viewer see the result of the effect very crystal clear. For this lab, I did not take much time to finish it because we have already had practice duplicating layers, and writing texts in photoshop. I had no difficulties completing this lab, all I can say is that I enjoyed this lab very much. Lab #5, well help me later in the future because when we want to edit photos, we have to make sure the photo editing is appealing to the viewers eye and well make the viewer not take their eyes off it. The filters must make a photo look more intense and interesting than the original picture. 


Monday, November 9, 2015

HW- Note Taking

           Our whole lives, we have been required to take notes. Note taking is very important because notes help us review a certain topic and when we need to refresh our minds, we could just look back at the notes taken. At school, when taking notes, we have to use the Cornell note taking format. On the left side of my notes, I write important key words I know I should remember and are going to be appear often throughout the curriculum. On the right side, I write the definition of words. However, if I know I am having a hard time remembering or understanding a term, I put a star next to that term.  I find the Cornell Note taking format to be a great method of organizing notes because it helps us organize notes in a simple and neat manner. At times although I take notes in class, I do not understand or reminder anything discussed in class. Therefore, I rewrite my notes to help me remember the terms learned in class. When taking notes it's very immoral to write down the definition of a term, in words you comprehend. If you write down the definition of a term with a language (or use of words) you do not understand, then its useless taking notes. Everyone has a different method of taking notes and using those notes to understand a certain topic.